CartoWeb plugins are modular packages of files (PHP classes, HTML templates, images and other resources) that are used to perform a dedicated action: main map formatting, layers browsing interface, map browsing (zooming, paning etc.), queries, user authentication, search interfaces and many more.
There are two kinds of plugins:
-
coreplugins: fundamental plugins that perform "low-level" actions such as map size handling, browsing tools, layers selection. Plugins that are frequently used in many CartoWeb applications may be included in this category as well. They are always available and activated. As a result, other plugins may interact with them. Coreplugins files are grouped in thecoreplugins/directory. -
plugins: "normal" plugins perform more specificactions and are not always activated. Normal plugins activation is done by setting theloadPluginsparameter inclient_conf/client.inifor CartoClient plugins and inserver_conf/<mapId>/<mapId>.inifor CartoServer ones. For instance:loadPlugins = auth, outline, exportHtmlSince they are not always available, simple plugins usually do not rely on each other. On the other hand, it is not a problem for them to call some coreplugins functionalities if the latter are publicly accessible. Simple plugins files are grouped in theplugins/directory.
The general philosophy is to gather all files of a given plugin in
the same dedicated directory, including files from both CartoClient and
CartoServer sides of the plugin. Thus it is easy to "plug" a new module
in CartoWeb architecture by simply pasting it in the
plugins/ or coreplugins/ parent
directories. Note however that plugins configuration files (named
<pluginName>.ini) are placed in the
client_conf/ and/or
server_conf/<mapId>/ depending if those
plugins have CartoClient/CartoServer components.
Plugins and coreplugins have the following general structure:
<pluginName>/
<pluginName>/client/
<pluginName>/server/
<pluginName>/common/
<pluginName>/templates/
<pluginName>/htdocs/
<pluginName>/htdocs/gfx/
<pluginName>/htdocs/js/
<pluginName>/htdocs/css/
-
client/contains all specific CartoClient-side PHP files. -
server/contains all specific CartoServer-side PHP files. -
common/contains PHP files shared by both CartoClient and CartoServer sides, or at least files that are not specific to one side or the other. -
templates/contains all the plugin-specific Smarty templates. Since HTML templates are only used in CartoClient, files fromtemplates/are only called byclient/code. -
htdocs/contains all files (PHP pages, images, JavaScript or CSS files, etc.) that may be web-accessed when running the plugin. Those files are dispatched in various directories depending on their nature. If necessary, you can create additional subdirectories. For instancejava/if your plugin uses a Java applet. To preserve the plugin independence, it is strongly recommended not to add your CSS styles in the general CartoClient style sheet but to create a specific file here that will be called separately.
Note that it is not required to actually create the whole structure
described above. Only directories that contain files are necessairy. For
instance if a plugin only perform CartoServer actions, it is no use to
create client/, templates/ and
htdocs/ directories. common/
may be usefull if not-CartoServer-specific classes have to be defined.
There are two ways to add a plugin/coreplugin to CartoWeb: writing a brand new one or overriding/extending an existing one.
If no existing plugin or coreplugin fulfils your requirements and if none offers close enough functionalities to justify an adaptation, you can write a new plugin.
Plugins main classes (client and/or server if any) must extend
CartoWeb definedClientPlugin and/or
ServerPlugin classes which provide base plugin
tools. For instance:
class ClientYourPlugin extends ClientPlugin {

    /* here comes your plugin client class definition */

}
First of all you have to determine if you are about to design a simple plugin or a coreplugin. To be a coreplugin, your plugin must be really generic and present a great interest to the CartoWeb users community since it might be included in the upstream distribution. Contact CartoWeb development team for more info. In most cases it is better and sufficient to create a simple plugin.
To activate a coreplugin, update the
Cartoclient::getCorePluginNames() method in
/client/Cartoclient.php and/or the
ServerContext::getCorePluginNames() one in
/server/ServerContext.php. For instance:
private function getCorePluginNames() {
return array('images', 'location', 'layers', 'query', 'mapquery',
             'tables', 'yourPluginName');
}
To load a regular plugin, update the
loadPlugins parameter from
client_conf/client.ini and/or
server_conf/<mapId>/<mapId>.ini as in
following example:
loadPlugins = auth, outline, exportHtml
As explained in Section 2.1, “ What are Plugins”, plugins are independent aggregations of PHP code that are called by the CartoWeb core classes to perform dedicated actions. Plugins are called several times during the program execution (entry points). Thus they can interact at various level of the application.
To determine what plugins must be called at what moment and to
perform what action, plugins must implement one or more of the CartoWeb
plugin interfaces (according to the object-oriented programing meaning).
The interfaces define methods that will be triggered by the main program
during its execution. For example, you can take a look at the following
simplified Cartoclient::doMain() method ("main
program") defined in /client/Cartoclient.php:
private function doMain() {
    $this->callPluginsImplementing('InitUser', 'handleInit',
                                   $this->getMapInfo());

    if ($this->isRequestPost()) {
        $this->cartoForm =
            $this->httpRequestHandler->handleHttpRequest(
                                                $this->clientSession,
                                                $this->cartoForm);

        $request = new FilterRequestModifier($_REQUEST);
        $this->callPluginsImplementing('FilterProvider',
                                       'filterPostRequest', $request);
        $this->callPluginsImplementing('GuiProvider',
                                       'handleHttpPostRequest',
                                       $request->getRequest());
    } else {
        $request = new FilterRequestModifier($_REQUEST);
        $this->callPluginsImplementing('FilterProvider',
                                       'filterGetRequest', $request);
        $this->callPluginsImplementing('GuiProvider',
                                       'handleHttpGetRequest',
                                       $request->getRequest());
    }

    $mapRequest = $this->getMapRequest();
    $this->callPluginsImplementing('ServerCaller', 'buildRequest',
                                   $mapRequest);

    $this->mapResult = $this->getMapResultFromRequest($mapRequest);

    $this->callPluginsImplementing('ServerCaller', 'initializeResult',
                                   $this->mapResult);

    $this->callPluginsImplementing('ServerCaller', 'handleResult',
                                   $this->mapResult);

    $this->formRenderer->showForm($this);

    $this->callPluginsImplementing('Sessionable', 'saveSession');
    $this->saveSession($this->clientSession);
}
callPluginsImplementing($interfaceName,
      $methodName, $argument)
is run at various points of the
program and make plugins implementing given <interfaceName>
interface execute given <methodName> with given <argument>
argument.
Of course interface-defined methods must be implemented in the matching plugins. Plugins can implements one or more CartoWeb interfaces.
Implementing interfaces is not mandatory when writing a plugin but not doing so will keep plugins from being implicitely called by the main program. As a result, methods from plugins with no interface implementation - also called "service plugins" - must be explicitely called by another piece of code (generally an other plugin).
class ClientYourPlugin extends ClientPlugin
                       implements Sessionable, GuiProvider {

    /* here comes your plugin client class definition */

}
For a comprehensive list of available client and server interfaces,
see /client/ClientPlugin.php and
/server/ServerPlugin.php files or take a look at the
CartoWeb PHP API documentation.
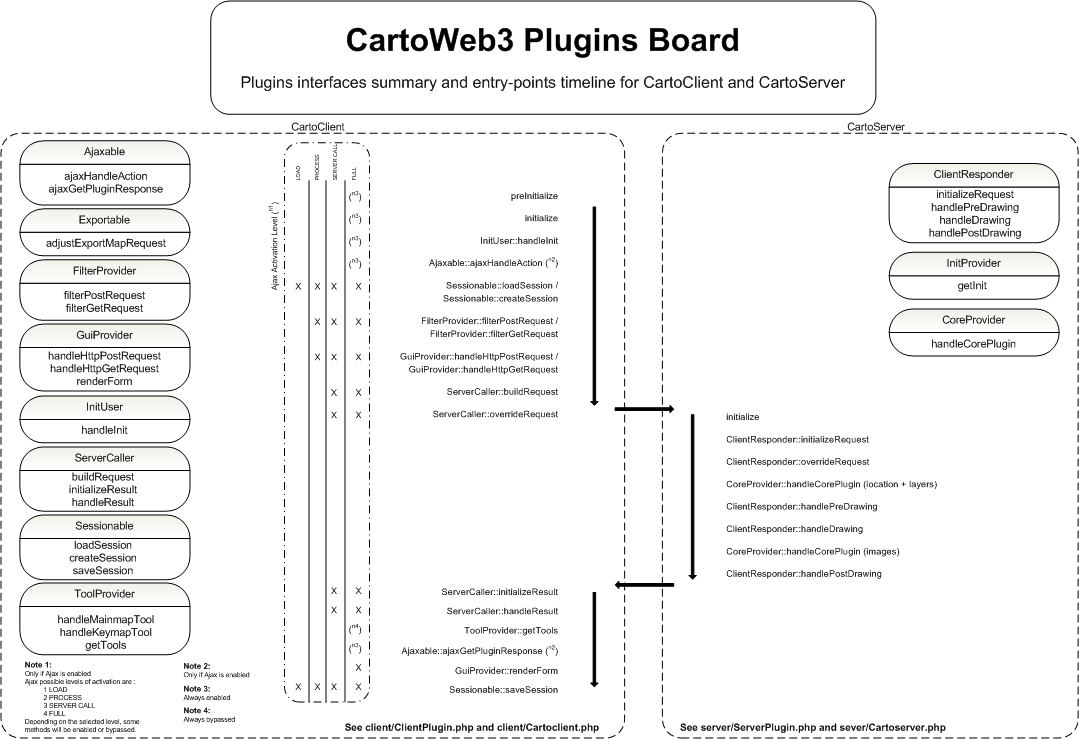
(Get a high quality version of this diagram here.)
- Determine if you will write a plugin or a coreplugin.
- Create a
<yourPlugin>/directory in/projects/<yourProject>/plugins/if you need a simple plugin. Directory name will be the plugin name. You can use whatever name you want except of course names of already existing plugins or coreplugins. Yet it is recommended to use lowercase letters, capitalizing only the first letter of each word that composes the name (eg. "yourPluginName"). In case of a coreplugin, there is no way to create a coreplugin in a project context. Coreplugins can only be integrated in the upstream application. It is not recommended to do so without CartoWeb developers agreement because of compatibility troubles that may occur when upgrading, etc. - Create subdirectories to store all plugin-related resources files and templates.
- Create
client/,server/,common/if your plugin as CartoClient, CartoServer and respectively common parts. - Create your main PHP classes files. Those files must be named
using the first-letter-capitalized name of your plugin, prefixing
it with "Client" or "Server" for client or server components (eg.
ClientYourPlugin.php,ServerYourPlugin.php,YourPlugin.php). - Extend
ClientPluginand/orServerPluginCartoWeb classes in the matching above files and name the result classes using their files names (with no ".php"). For instance:<?php /** * @version $Id: ServerYourPlugin.php,v 1.8 2005/02/23 11:52:43 johndoe Exp $ */ class ServerYourPlugin extends ServerPlugin { - Make your classes implement needed interfaces and redefine
corresponding methods. Note that the
common/part class "YourPlugin" does not have to extend or implement any CartoWeb class or interface. It is used as a container for common data and treatment used by client and server classes. - If your plugin is implementing
ServerCallerandClientResponder, you will need to write the WSDL code for the plugin request and response. See Section 2.1, “ What are Plugins” for examples on how to write such WSDL documents.Note
You need to add a
classNameelement in the WSDL file for a proper parsing from CartoWeb - Activate your plugin by adding its name to the
loadPluginsof the matching project configuration files.
Main plugin PHP files (eg.
ClientYourPlugin.php,
ServerYourPlugin.php,
YourPlugin.php) are automatically included and their
contained classes and objects are directly accessible. Other files in
client/, server/ or
common/ are not and must be included explicitely in
the main plugin PHP files.
Templates stored in the plugin templates/
directory are also accessible directly by using PHP code similar to the
followin one:
$smarty = new Smarty_Plugin($this->getCartoclient(), $this);
$smarty->assign('foo', 'bar');
return $smarty->fetch('yourPlugin.tpl');
If an already available plugin or coreplugin offers close functionalities to the ones you need, if you wish to slightly modify its behavior or simply want to adapt its output to your website layout, it is far easier to adapt it then to build a new one from scratch.
There are two levels of plugin adaptation. You can:
- override its HTML templates, resources (pictos, CSS or JS files) and its configuration as well. This approach is generally sufficient when you only need to adapt the layout.
- extend the main PHP classes to add your own methods or overload existing ones. This approach is required when you need to add some PHP code to the plugin.
Both approaches are not incompatible and may be combined to obtain desired result. See Section 2.3.4, “Combining Both Approaches” for more explanations.
Overriding a plugin is the simplest way to adapt it to your needs. It is done by duplicating the plugin files (at least the ones you want to adapt) in your project frame. For more information about projects handling, see Section 2.4, “Projects”.
This approach is recommended when you want to use your own versions
of the plugin templates or resources. Moreover you can add any new
resources files that will be called in your customized templates. However
you will not be able to replace or add PHP files (except PHP pages in the
plugin htdocs/. To adapt a plugin server-side
behavior (PHP classes), you have to extend the plugin, which is explained
in Section 2.3.3, “Extending
a Plugin”.
Say for instance, you want customize the
layers coreplugin by modifying its template
layers.tpl and rewriting some of its JS tools
(stored in layers.js). Than your project-adapted
coreplugin will look like:
/projects/<yourProjectName>/coreplugins/layers/
/projects/<yourProjectName>/coreplugins/layers/templates/
/projects/<yourProjectName>/coreplugins/layers/templates/layers.tpl
/projects/<yourProjectName>/coreplugins/layers/htdocs/
/projects/<yourProjectName>/coreplugins/layers/htdocs/js/
/projects/<yourProjectName>/coreplugins/layers/htdocs/js/layers.js
If you don't need to override the CSS file, it is no
use to create a css/ directory containing a copy of
the upstream layers.css.
If you want to neutralize a file, you can simply override it with a blank version. For instance to have a void output, create a template file with no content.
It is also possible to override the plugin configuration files by
adding <pluginName>.ini files in the project
configuration directories client_conf/ and/or
server_conf/<mapId>/. When the plugin is
launched, upstream and project configuration files are merged so you
don't need to duplicate the configuration parameters that stay unchanged
with your adapted plugin.
Extending a plugin is required when your adaptations involve deep changes such as additions or overloadings of methods in the plugin PHP classes.
To do so you will have to extend the plugin PHP classes in the
object-oriented programing definition. Since plugin main classes are
named using a plugin-name based convention (eg.
ClientLayers and
ServerLayers for the CartoClient and
CartoServer main classes of the layers
coreplugin) and since extended classes cannot have the same name than
their parent class, you will have to rename your plugin. Any plugin name
is OK (as long as it is not already used!) but it is recommended to use a
<projectName><initialPluginName> separating words with caps.
Extended coreplugins directories and files must be saved in
/projects/<projectName>/coreplugins/<extendedPluginName>/
whereas extended simple plugins ones will be located in
/projects/<projectName>/plugins/<extendedPluginName>/.
When writing your extended class, the first thing to do is to
specify what plugin is replaced by the new one. This is done by
overloading the replacePlugin() method. It should
return the replaced plugin name. For instance, to extend the
layers coreplugin CartoClient part in your
myProject project, create a
ClientMyProjectLayers.php as follows:
<?php
/**
 * @package CorePlugins
 * @version $Id: ClientMyProjectLayers.php,v 1.8 2005/02/23 11:52:43 johndoe Exp $
 */

class ClientMyProjectLayers extends ClientLayers {

    public function replacePlugin() {
        return 'layers';
    }

    /* Add or overload methods here */

}
?>
To be activated, extended plugins AND coreplugins must
be explicitely be declared in the loadPlugins
parameter of your project general configuration files:
loadPlugins = exportPdf, auth, myProjectLayers
With no surprise, extended classes can take advantage of the tools provided by the interfaces their parent classes implement. By implementing additional interfaces, they will have access to complementary interactions as well. In that case, don't forget to overload the matching interface-defined methods in your extended class. For instance:
ClientMyProjectLayers extends ClientLayers
                      implements ToolProvider {

/* ... */

}
Tip
To use new config parameters in your extended plugin, add them in the .ini file of your project original plugin (eg. /projects/<your_project>/client_conf/<original_plugin>.ini).
If you need to modify/add templates or resources (overrriding) AND PHP classes (extension), you can combine both approaches by following the instructions of the two last sections.
Say you would like to customize the images
coreplugin (mainmap size and formats management) to:
- update the layout (new pictos, new texts, new CSS),
- add some JS processing,
- add a new form field in a separated area of the CartoWeb interface.
First point is achieved by creating a images/
directory in /projects/yourProject/coreplugins/ and
filling it with an overriden template mapsizes.tpl,
a new images.css and some pictos:
/projects/yourProject/coreplugins/images/
/projects/yourProject/coreplugins/images/templates/mapsizes.tpl
/projects/yourProject/coreplugins/images/htdocs/css/images.css
/projects/yourProject/coreplugins/images/htdocs/gfx/button.png
<!-- mapsizes.tpl -->
<p>{t}Mapsize:{/t}
<select name="mapsize" id="mapsize" onchange="javascript:checkMapsize();">
{html_options options=$mapsizes_options selected=$mapsize_selected}
</select>
<input type="image" src="{r type=gfx plugin=images}button.png{/r}"
alt="{t}Ok button{/t}" id="imagesButton" /></p>
For details
about template {r} (resource) and
{t} (translation) tags, see Section 17.2, “Internationalization” and Section 17.3, “Resources”.
checkMapsize() JavaScript function is not
defined in the upstream coreplugin. So we have to add a JS file in our
overriden plugin:
/projects/yourProject/coreplugins/images/htdocs/js/
/projects/yourProject/coreplugins/images/htdocs/js/images.js
/* images.js */

function checkMapsize() {
  alert('foobar');
}
To add a new form field in a separated area and consequently in a
separated template, there is no other way than to modify the
ClientImages PHP class in order to call the
additional template in a special method. The extension approach is thus
required. Then create a yourProjectImages/ directory
in /projects/yourProject/coreplugins/ as follows:
/projects/yourProject/coreplugins/yourProjectImages/
/projects/yourProject/coreplugins/yourProjectImages/client/
/projects/yourProject/coreplugins/yourProjectImages/client/ClientYourProjectImages.php
It can seem a little tricky but the new template file
(say yourImages.tpl) will not be stored in
/projects/yourProject/coreplugins/yourProjectImages/templates/
as one can expect it but in
/projects/yourProject/coreplugins/images/templates/
with the templates of the "overriden part" of the coreplugin. Remember:
templates are stored in the overriden part and PHP classes in the
extended part.
<!-- yourImages.tpl -->

<input type="text" name="testField" value="{$imagesTest}" />
<?php
/**
 * @version $Id: ClientYourProjectImages.php,v 1.8 2005/02/23 11:52:43 johndoe Exp $
 */

class ClientYourProjectImages extends ClientImages {

    // indicates that we want to use current plugin instead of
    // regular images plugin
    public replacePlugin() {
        return 'images';
    }

    // overloaded method
    public function renderForm(Smarty $template) {
        // a {$image2} Smarty var must have been added in cartoclient.tpl
        $template->assign('image2', $this->drawNewImagesField());
        parent::renderForm($template);
    }

    // additional method
    private function drawNewImagesField() {
        $smarty = new Smarty_Plugin($this->getCartoclient(), $this);
        $smarty->assign('imagesTest', 'Foobar');
        return $smarty->fetch('yourImages.tpl');
    }
}
?>
Don't forget to activate the extended plugin in
/projects/yourProject/client_conf/client.ini:
loadPlugins = yourProjectImages
Export plugins allow to export maps and data. Concepts described below provide tools to help writing such plugins.
In brief, export plugins follow these steps in order to generate an output:
- Retrieve last request that was sent to server
- Call all plugins to ask for request modification (eg. map resolution changes, keymap generation enabled/disabled, etc.)
- Call server to get a new modified result
- Use the result to generate output
- Return output in a standardized form
Warning
Export plugins MUST have names that begin with the string
"export", for instance exportPdf,
exportCsv or exportHtml.
This rule does not apply to extended plugins since only the original plugin name is detected.
Class ExportPlugin implements a special type
of client plugin, with some specific functionnalities for export. It
implements interface GuiProvider so child
classes must implement corresponding methods. Class methods are:
getLastMapRequest: returns last used request object. This is useful to prepare a new call to server in order to obtain data specific to export. This call is done in methodgetExportResultgetLastMapResult: This can also be useful in some cases to have the last returned result obectgetExportResult: executes call to server in order to obtain a modified result suitable for export generation. Calls all exportable plugins in order to modify request (see Section 2.4.1.4, “ExportableInterface”)getExport(abstract): contains export generation itself. Should prepare export configuration, callgetExportResultand generate export in anExportOutputobject
Export configuration objects contain information on what is needed by export plugin to generate output. For instance, for a CSV export, no images are needed and it would be a waste of time to generate them.
Configuration is set in method getExport, then
passed to method getExportResult in order to get
modified result. Configuration is used by plugin to know how to modify
request to retrieve useful data.
Exportable interface declares a method
adjustExportMapRequest which modifies a standard
map request to a special export request. For instance, plugin Image
uses ExportConfiguration object to know if maps
are needed by export plugin. If not, image request is modified.
Plugin exportCsv is a good, simple example of
export plugin.
Configuration is filled in method
getConfiguration. No images are required
to output a CSV file:
protected function getConfiguration() {
    $config = new ExportConfiguration();
    $config->setRenderMap(false);
    $config->setRenderKeymap(false);
    $config->setRenderScalebar(false);
}
Result rendering is done in method getExport.
Note that no calls to methods getLastMapRequest or
adjustExportMapRequest are needed, as those calls
are handled by method getExportResult:
protected function getExport() {
    $this->getExportResult($this->getConfiguration());

    // ...

    $output = new ExportOutput();
    $output->setContents($contents);
    return $output;
}
Final output (headers + content) is done in method
output. For instance:
public function output() {
    header('Content-Type: text/html');
    print $this->getExport()->getContents();
    return '';
}
Filter plugins can be used to modify parameters transfered from browser to CartoWeb client. These parameters can be part of a POST request (HTML forms) or a GET request (URL query string).
Once a new filter plugin has been developed, it can be activated by
adding it to the loadPlugins variable in file
client_conf/client.ini.
Interface FilterProvider declares following methods:
filterPostRequest(FilterRequestModifier
            $request)
: modifies parameters transfered via a POST requestfilterGetRequest(FilterRequestModifier $request): modifies parameters transfered via a GET request
Class FilterRequestModifier is used to get
old values from the request and set new ones. It implements two main
methods:
getValue($key): retrieves old valuesetValue($key, $value): sets new value
This is the list of global parameters accepted by CartoWeb via GET
reset_session: This will reset all session parameters to default value. Useful when you want to go back to the initial stats of the applicationhttp://www.yoursite.org/cartoweb3/htdocs/client.php?reset_sessionprevent_save_session: This will bypass the session save. Useful when you want to performe an action without effect on the actual state of the application. This was added specifically when using the mode=image global parameterhttp://www.yoursite.org/cartoweb3/htdocs/client.php?prevent_save_sessionmode: This will define the kind of output of CartoWeb. By default it will be html. Another possible output isimage. In this case, CartoWeb will only output an image.http://www.yoursite.org/cartoweb3/htdocs/client.php?mode=imageThe image mode can be used with other plugin specific parameters:http://www.yoursite.org/cartoweb3/htdocs/client.php?mode=image&recenter_x=300000&recenter_y=5150000&recenter_scale=150000
This is the list of parameters that can be set in a filter plugin
using function setValue() (in php file) or GET request (URL query string):
- Images plugin
mapsize- ID of the selected map size (see Section 8.1, “ Client-side Configuration ”)customMapsize- this string parameter enables to specify a customized map size using the syntax[width]x[height],[width]and[height]being positive integers (size in pixels). You may specify dimensions limitations inclient_conf/images.ini(see Section 8.1, “ Client-side Configuration ”)drawMainmap- boolean indicating if the mainmap must be drawn or not.drawKeymap- boolean indicating if the keymap must be drawn or not.drawScalebar- boolean indicating if the scalebar must be drawn or not.
- Location plugin
recenter_bbox- new bounding box, comma-separated coordinates, eg. "10.5,20,15.5,28"recenter_x- re-centering: new x-coordinaterecenter_y- re-centering: new y-coordinateshow_crosshair- '0' or '1', default '0'. If '1' display a crosshair on (recenter_x, recenter_y).recenter_scale- new scaleid_recenter_layer- re-centering on objects: layer to look for IDsid_recenter_ids- re-centering on objects: list of IDs, comma-separatedshortcut_id- ID of the selected map size (see Section 7.2, “Server-side Configuration”)
- Query plugin
query_layer- layer to look for IDsquery_select- IDs of objects to add to selectionquery_unselect- IDs of objects to remove from selectionquery_policy- selection policy: 'POLICY_XOR', 'POLICY_UNION' or 'POLICY_INTERSECTION', default is 'POLICY_XOR'query_maskmode- '0' or '1', default is '0'. If '1', will show selection as a mask.query_hilight- '0' or '1', default is '1'. If '0', won't shows selection hilighted.query_return_attributes- '0' or '1', default is '1'. If '0', won't return attributes other than IDs.query_return_table- '0' or '1', default is '1'. If '0', won't return any table results.query_clear- '0' or '1', default is '0'. If '1', previous query results are purged even if they were marked as persistent.
- Layers plugin
switch_id- id of the switch to be used when the children switching is activated (see Section 6.2.4, “Children Switching”).layer_select- comma-separated list of layers or layerGroups id's that must be added into the activated layers list.layer_unselect- comma-separated list of layers or layerGroups id's that must be removed from the activated layers list. In some cases, layerGroups children might have to be explicitely listed to actually be removed.
Warning
Note that for Query plugin, display of extended selection must be
disabled in client's query.ini in order to use
above parameters (see Section 9.1, “Client-side Configuration”).
Tip
To make CartoWeb outputs a map as a raw image file (no HTML generated), you may use the GET parameter mode=image. For instance:
http://example.com/cartoweb3/client.php?mode=image&mapsize=2
The following class implements a filter which allows to recenter on an object while hilighting it:
class ClientFilterIdrecenter extends ClientPlugin
                             implements FilterProvider {

    public function filterPostRequest(FilterRequestModifier $request) {}

    public function filterGetRequest(FilterRequestModifier $request) {

        $id = $request->getValue('id');
        if (!is_null($id)) {
            $layer = 'grid_classhilight';
            $request->setValue('query_layer', $layer);
            $request->setValue('query_maskmode', '1');
            $request->setValue('query_select', $id);

            $request->setValue('id_recenter_layer', $layer);
            $request->setValue('id_recenter_ids', $id);
        }
    }
}
Tables plugin is responsible for table formatting and display.
Tables plugin declares several structures to help plugin developer manage tables. These structures are:
- Class
Tablewhich includes in particular a list of rows (classTableRow) - Class
TableGroupwhich includes in particular a list of tables. Table groups are used for instance to separate table results coming from several plugins - Class
TableFlagswhich defines parameters that will be useful for a plugin using tables
Typically, a plugin using table will include a
TableFlags in its request and a
TableGroup in its result. This is the case for
Query plugin, which is the only core plugin which uses tables.
Tables plugin maintains an object called the registry (one on client and one on server). This object allows to add table rules, which will describes how tables must be displayed.
It is recommended to add rules in plugin's
initialize() method, so they are ready at the
earliest stage. To obtain the registry object, first you have to get
the Tables plugin object.
On client:
public function initialize() {

    $tablesPlugin = $this->cartoclient->getPluginManager()->tables;
    $registry = $tablesPlugin->getTableRulesRegistry();

    // Add rules here
}
On server, plugin manager is stored in
ServerContext object:
    // ...
    $tablesPlugin = $this->serverContext->getPluginManager()->tables;
    // ...
Now you are ready to add rules. Next sections describe the different types of rules. Registry's method signature is explained for each type.
Once rules have been added in registry, they must be executed on tables. See Section 2.4.3.4, “Executing Rules” for a description of table rules execution.
public function addColumnSelector($groupId, $tableId, $columnIds)
Column selector rules allow to keep only a subset of columns from
the source table. Parameter $columnIds should
contain an array of column IDs determining which columns to
keep.
public function addColumnUnselector($groupId, $tableId, $columnIds)
Column unselector rules allow to keep only a subset of columns
from the source table, by removing a list of columns. Parameter
$columnIds should contain an array of column
IDs determining which columns to remove.
public function addGroupFilter($groupId, $callback)
Group filter rules allow to modify group title. Parameter
$callback should contain a pointer to a
callback method with the following signature:
static function myCallbackMethod('group_id', 'group_title')
    return 'group_new_title'
public function addTableFilter($groupId, $tableId, $callback)
Table filter rules allow to modify table title. Parameter
$callback should contain a pointer to a
callback method with the following signature:
static function myCallbackMethod('table_id', 'table_title')
    return 'table_new_title'
public function addColumnFilter($groupId, $tableId,
                                $columnId, $callback)
Column filter rules allow to modify column title. Parameter
$callback should contain a pointer to a
callback method with the following signature:
static function myCallbackMethod('table_id', 'column_id', 'column_title')
    return 'column_new_title'
public function addCellFilter($groupId, $tableId, $columnId,
                              $inputColumnIds, $callback)
Cell filter rules allow to modify content of a cell. Values of
columns given in parameter $inputColumnIds
will be transfered to the callback method for cell content
calculation. Parameter $callback should
contain a pointer to a callback method with the following
signature:
static function myCallbackMethod('table_id', 'column_id',
                                 array ('column_1' => 'value_1',
                                        'column_2' => 'value_2'))
    return 'cell_value'
Note
To return all column's data to the callback function, you can use NULL.
        $registry->addCellFilter('query', 'table_name', '*', NULL,
                   array('TableRulesClassName', 'callbackFunctionName'));
This will apply the callbackFunctionName function to all column of table table_name and the callback function will receive an array containing the values of all columns.
public function addCellFilterBatch($groupId, $tableId, $columnId,
                                   $inputColumnIds, $callback)
Cell filter rules used in batch mode allow to modify content of
all cells of a given column. Values of columns given in parameter
$inputColumnIds will be transfered to the
callback method for cells content calculation. Values for all rows
are transfered at the same time. Parameter
$callback should contain a pointer to a
callback method with the following signature:
static function myCallbackMethod('table_id', 'column_id',
                                 array (
                                 '0' => array (
                                        'column_1' => 'value_1_row_1',
                                        'column_2' => 'value_2_row_1'),
                                 '1' => array (
                                        'column_1' => 'value_1_row_2',
                                        'column_2' => 'value_2_row_2')))
    return array ('0' => 'cell_value_row_1', '1' => 'cell_value_row_2')
public function addRowUnselector($groupId, $tableId,
                                 $columnId, $rowIds)
Row unselector rules allow to remove some rows from a table.
Parameter rowIds contains IDs of row that must
be removed.
public function addRowSelector($groupId, $tableId,
                                 $columnId, $rowIds)
Row selector rules allow to keep only some rows from a table.
Parameter rowIds contains IDs of row that must
be kept.
public function addColumnAdder($groupId, $tableId,
                               $columnPosition, $newColumnIds,
                               $inputColumnIds, $callback)
Column adder rules allow to add one or more columns to the table.
Parameter $newColumnIds should contain the
list of new column IDs. Values of columns given in parameter
$inputColumnIds will be transfered to the
callback method for cell content calculation. Parameter
$callback should contain a pointer to a
callback method with the following signature:
static function myCallbackMethod('table_id',
                                 array ('column_1' => 'value_1',
                                        'column_2' => 'value_2'))
    return array ('new_column_1' => 'cell_value_1',
                  'new_column_2' => 'cell_value_2')
Parameter $columnPosition indicates where
the new columns must be inserted. It should be an instance of class
ColumnPosition. Positions can be absolute or
relative, with a positive or negative offset:
$position = new ColumnPosition(ColumnPosition::TYPE_ABSOLUTE, 1);The new columns will be added after the first column$position = new ColumnPosition(ColumnPosition::TYPE_ABSOLUTE, -2);The new columns will be added just before the last column$position = new ColumnPosition(ColumnPosition::TYPE_RELATIVE, 0, 'column_1');The new columns will be added just before column 'column_1'$position = new ColumnPosition(ColumnPosition::TYPE_RELATIVE, 1, 'column_1');The new columns will be added just after column 'column_1'
public function addColumnAdderBatch($groupId, $tableId,
                                    $columnPosition, $newColumnIds,
                                    $inputColumnIds, $callback)
Column adder rules used in batch mode allow to add one or more
columns to the table, while calculating values for all newly added
cells. Parameter $newColumnIds should contain
the list of new column IDs. Values of columns given in parameter
$inputColumnIds will be transfered to the
callback method for cells content calculation. Values for all rows
are transfered at the same time. Parameter
$callback should contain a pointer to a
callback method with the following signature:
static function myCallbackMethod('table_id',
                                 array (
                                 '0' => array (
                                        'column_1' => 'value_1_row_1',
                                        'column_2' => 'value_2_row_1'),
                                 '1' => array (
                                        'column_1' => 'value_1_row_2',
                                        'column_2' => 'value_2_row_2')))
    return array (
           '0' => array (
                  'new_column_1' => 'cell_value_1_row_1',
                  'new_column_2' => 'cell_value_2_row_1'),
           '1' => array (
                  'new_column_1' => 'cell_value_1_row_2',
                  'new_column_2' => 'cell_value_2_row_2')))
See Section 2.4.3.2.10, “ColumnAdder” to
know more about parameter
$columnPosition.
public function addColumnReorder($groupId, $tableId, $columnIds)
Column reorder rule allow you to reorder the columns and their
contents. Parameter $columnIds should
contain an array of column IDs given the new column's
order. Note that all the IDs must appear in
$columnIds even they don't move.
Depending on rule type, rules are set for a group, a table or a
column. Parameters ($groupId,
$tableId or $columnId)
can point to one object or to a group of object, using wildcard
'*':
- 'column_1': rule will be executed on columns called 'column_1' only
- 'col*': rule will be executed on columns with name starting with 'col'
- '*': rule will be executed on any columns
For instance, following rule may be executed on groups with name starting with 'myGr', tables called 'myTable' and all columns:
$registry->addColumnFilter('myGr*', 'myTable', '*',
                                     array($this, 'myCallbackMethod));
Only one rule of each type may be executed on one item. If two or more rules apply, most specific rule will be choosen. In the following rule definition, only the third rule will be executed on a table 'myTable' in a group 'myGroup':
$registry->addColumnSelector('*', '*', array('column_1', 'column_2'));
$registry->addColumnSelector('myGr*', '*', array('column_1'));
$registry->addColumnSelector('myGr*', 'myTable', array('column_2'));
$registry->addColumnSelector('myGroup', 'toto', array('column_3'));
Each time a table group is created, it must be stored in Tables plugin in order to display it:
$tablesPlugin = $this->cartoclient->getPluginManager()->tables;
$tablesPlugin->addTableGroups($newTableGroup);
Tables rules are executed automatically at the same time.
Rules execution must be done explicitly on server. A call to
Tables plugin applyRules method is needed for
each new table group before returning it to client:
$tablesPlugin = $this->serverContext->getPluginManager()->tables;
readyForClientTableGroups = $tablesPlugin->applyRules($newTableGroup);